|
| narsisco_lopez | | Thor |  |  | | Reg. Date | : | 09/09/2010 | | Posts | : | 2,765 | | Location | : | Golden (Showers!), Colorado, United States |
|
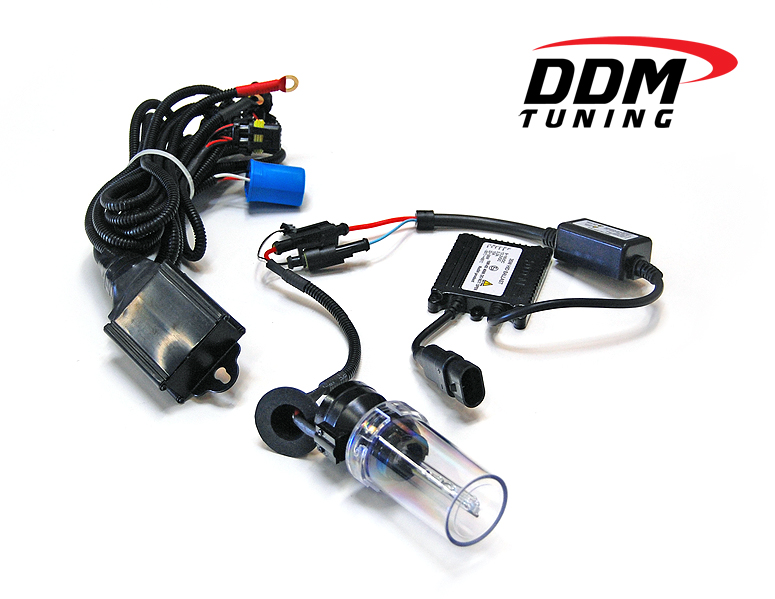
| | Posted : 26 Jan 2011 - 15:44 Post title : How to Install an HID/Bi-Xenon Light Kit | | | Here's how I installed a Bi-Xenon Headlight Kit from HID Country ( HID Country Bi-Xenon Kit )
About the kit:
~ 35 Watt
~ 6000K bulb
~ Bi-Xenon (High beam is achieved by tilting the bulb by electro-magnet)
~ 1 year warranty (an extra year is available from HID Country for $19.99... I didn't opt for it)
~ Super-fast shipping and delivery (Ordered on Jan. 14th - arrived Jan. 18th ~ USPS)
~ HID Country answers phone and replies to email questions very promptly
My initial observations:
1. The kit appears to be all Chinese-made/generic-branded components.
2. While Chinese-made, the quality appears very good... all connectors are water-proof and fairly robust.
3. Ballast is very small (see photo with my hand for reference)
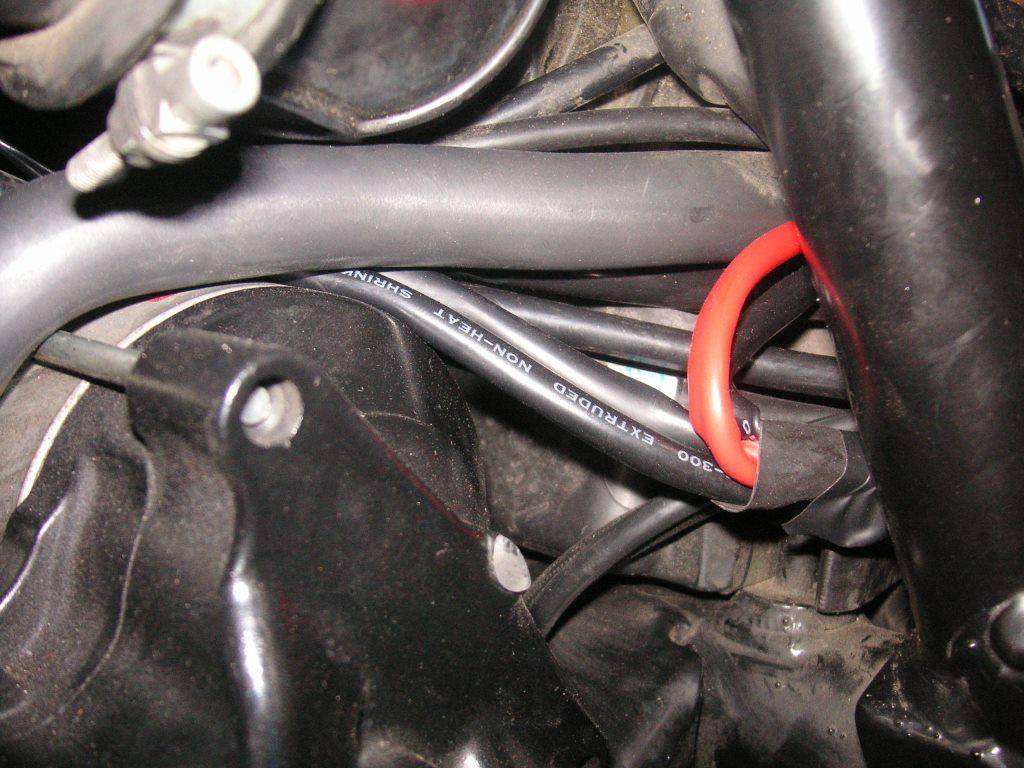
4. Power/Ground leads* ARE NOT long enough to reach battery... I had to add about 8" of additional lead to reach my new power block (see wire organization photo below.) ~ You can also pick up power at the headlight wiring harness, but I opted to route it back to the battery and extend it.
5. The whole bundle is small enough to fit in the headlight nacelle with the exception of the relay and power/ground leads. This will easily fit under the tank.
6. At $67 bucks delivered, it's more than half the price of the currently-available kits (as I mentioned earlier, those $49 DDM kits are no longer available.)
7. A long-term test/evaluation will be needed to see if this kit is actually worth it.
*Side Note: I'm planning on mounting a relay-controlled power distribution block to my Contraband Fairing as a handy place to tap power for my Zumo 660 and 12v assy. port (which I'm also mounting to the inside of the fairing ... in case I want to re-charge my new Sena SMH-10 Bluetooth Stereo Headset while riding ~ if anyone is interested in the Sena headset, I'll be doing an un-boxing and review vid sometime very soon). I made a "temporary" power distr. block that I mounted on top of the battery (see wire organization photo below.)
      
1. I pulled the headlight ring and removed the stock bulb and inserted the Bi-Xenon H4 bulb... was a perfect fit. Since I had the new wiring harness all snapped together (as in the photo immediately above), I started arranging/wrapping it so that the ballast and inverter would fit in the headlight nacelle.
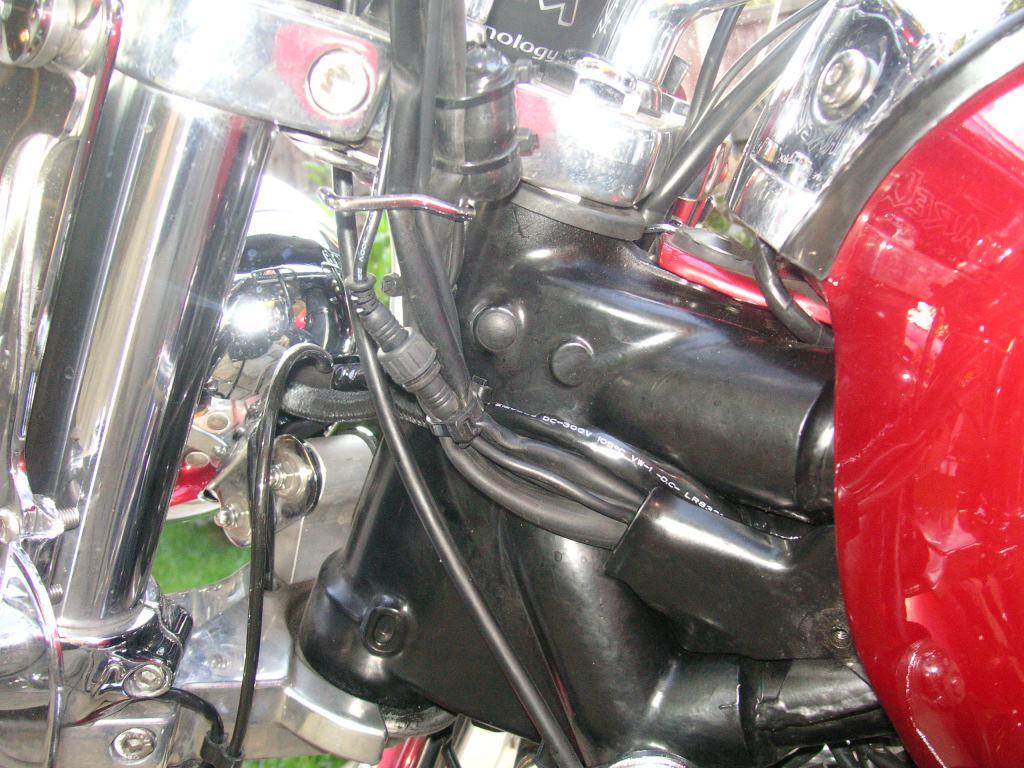
2. As I thought, there was no way the relay was also going to fit, so I routed the red power lead and relay (with ground wire) out of the back of the headlight and routed all of it under the tank.
3. You'll see from the photos below that I removed the horn bracket and routed the wires behind it (the other black cable you might see is the power harness for my Garmin Zumo 660 that I'm also routing back to power at the same time).
4. Good thing I have small hands, because routing is a bit tight (I propped the tank up with one of my wife's hiking boots!) ~ but, not impossible.... just required patience.
5. When I re-attached the horn bracket, I attached the kit's ground lead to one of the bolts as a handy place to pick up the ground. I also zip-tied the wiring bundle to keep it nice and clean. You could also use black wiring harness tape for another way to achieve a clean look.
6. You'll see my wiring organization** job under the seat. I went to Radio Shack and picked up an 8 position barrier strip and an 8 position jumper strip. I cut the jumper strip in half, and flipped one side to make a common 4 position positive side and a common 4 position negative side. This is only temporary as I'm debating about either making a relay-controlled power distribution block or buying the fancy-shmancy Aerostich PDM 60 Solid State Power Distribution Module (Damn, why is all this cool stuff SO expensive?? Made in the US, is probably why)
**Another Note: Making a power block is NOT a necessary step. I did it because I'm planning on adding additional accessories. You can either route the red lead and attach to the battery or pick up power from a switched power lead at the headlight harness. Of course, you will have find this lead to tap!
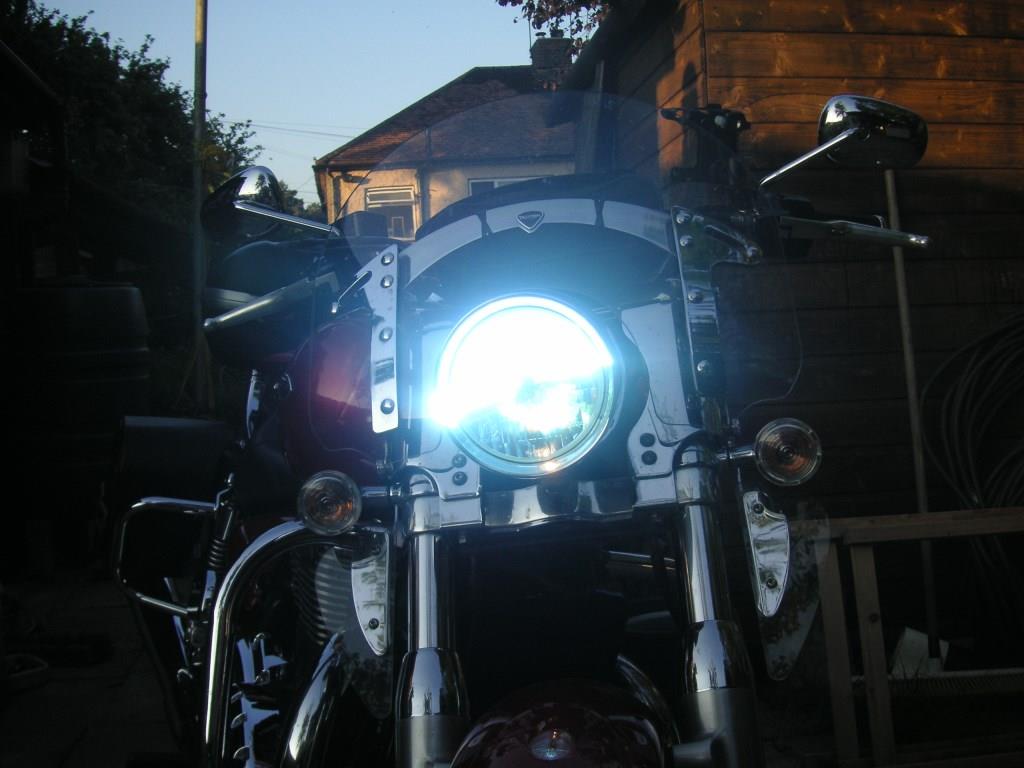
7. After wiring it up, I held my breath, and turned the key... no problems, just VERY BRIGHT WHITE LIGHT! 
        
| 2012 Storm (SOLD!)
Other Bikes:
2003 Suzuki DRZ400E (plated - my dual sport/mountain trail/camping bike)
Past Bikes:
2012 K13S
2009 KTM 990 Adventure
2010 Triumph Thunderbird 1600 (the Alien Queen)
2009 Triumph Sprint ST (another great bike!)
2007 Kawasaki ZX10R
2000 Kawasaki ZRX1100
1975 Honda SB550T "Clubman"
1981 Kawasaki KZ1000J
1985 Suzuki GS550E
1978 Yamaha 650 Special
| | Post edited by narsisco_lopez on 26 Jan 2011 - 15:53 |
|
|
|
| EnGage | | Thor | |  | | Reg. Date | : | 14/07/2009 | | Posts | : | 3,155 | | Location | : | Grand Rapids, MI, United States |
|
| | Posted : 26 Jan 2011 - 18:17 Post title : Re: How to Install an HID/Bi-Xenon Light Kit (Re: narsisco_lopez) | | | When you get your bike out on the road at night with this new light, please post back with a report.
thanks.
|
|
|
|
| narsisco_lopez | | Thor | | | | Reg. Date | : | 09/09/2010 | | Posts | : | 2,765 | | Location | : | Golden (Showers!), Colorado, United States |
|
| | Posted : 26 Jan 2011 - 20:53 Post title : Re: How to Install an HID/Bi-Xenon Light Kit (Re: EnGage) | | |
EnGage wrote:
When you get your bike out on the road at night with this new light, please post back with a report.
thanks. |
|
It snowed last night, but it's mostly gone and we're forecast for some warms temps the next few days, so I'll try to take her out either tonight or tomorrow... may even try to shoot some vid, while I'm at it.
| 2012 Storm (SOLD!)
Other Bikes:
2003 Suzuki DRZ400E (plated - my dual sport/mountain trail/camping bike)
Past Bikes:
2012 K13S
2009 KTM 990 Adventure
2010 Triumph Thunderbird 1600 (the Alien Queen)
2009 Triumph Sprint ST (another great bike!)
2007 Kawasaki ZX10R
2000 Kawasaki ZRX1100
1975 Honda SB550T "Clubman"
1981 Kawasaki KZ1000J
1985 Suzuki GS550E
1978 Yamaha 650 Special
|
|
|
|
| DizzE | | Thor | |  | | Reg. Date | : | 12/07/2010 | | Posts | : | 3,141 | | Location | : | Sunnyvale, CA, United States |
|
| | Posted : 26 Jan 2011 - 22:50 Post title : Re: How to Install an HID/Bi-Xenon Light Kit (Re: narsisco_lopez) | | | Looks good. I like the power block idea. Keep the details coming.

|
|
|
|
| narsisco_lopez | | Thor | | | | Reg. Date | : | 09/09/2010 | | Posts | : | 2,765 | | Location | : | Golden (Showers!), Colorado, United States |
|
| | Posted : 26 Jan 2011 - 23:06 Post title : Re: How to Install an HID/Bi-Xenon Light Kit (Re: DizzE) | | |
DizzE wrote:
Looks good. I like the power block idea. Keep the details coming.
|
|
Thanks DizzE... will do!
| 2012 Storm (SOLD!)
Other Bikes:
2003 Suzuki DRZ400E (plated - my dual sport/mountain trail/camping bike)
Past Bikes:
2012 K13S
2009 KTM 990 Adventure
2010 Triumph Thunderbird 1600 (the Alien Queen)
2009 Triumph Sprint ST (another great bike!)
2007 Kawasaki ZX10R
2000 Kawasaki ZRX1100
1975 Honda SB550T "Clubman"
1981 Kawasaki KZ1000J
1985 Suzuki GS550E
1978 Yamaha 650 Special
|
|
|
|
| Buzzo | | Set | | | Reg. Date | : | 20/01/2010 | | Posts | : | 110 | | Location | : | Brisbane, Queensland, Australia |
|
| | Posted : 27 Jan 2011 - 03:44 Post title : Re: How to Install an HID/Bi-Xenon Light Kit (Re: narsisco_lopez) | | | Another excellent write up. Thanks.
|
|
|
|
| narsisco_lopez | | Thor | | | | Reg. Date | : | 09/09/2010 | | Posts | : | 2,765 | | Location | : | Golden (Showers!), Colorado, United States |
|
| | Posted : 15 Mar 2011 - 17:50 Post title : Re: How to Install an HID/Bi-Xenon Light Kit (Re: Buzzo) | | | lwc1600 wrote:
I purchased the HID light kit from HID Country and installed it as per your thread in How To's section . It was a lor simpler install than I thought it would be. And the light difference is amazing. The company is located in Sarssota, Florida and ships almost same day. A large improvement for a small amout of money. |
|
Hey! Glad to hear it!
HERE'S A TIP: I removed the reflector that comes attached to the HID bulb and got WAY more light spread across the road without diminishing the amount of light that projects forward down the road, plus, the high beam angle of the HID seems to work better, too.
| 2012 Storm (SOLD!)
Other Bikes:
2003 Suzuki DRZ400E (plated - my dual sport/mountain trail/camping bike)
Past Bikes:
2012 K13S
2009 KTM 990 Adventure
2010 Triumph Thunderbird 1600 (the Alien Queen)
2009 Triumph Sprint ST (another great bike!)
2007 Kawasaki ZX10R
2000 Kawasaki ZRX1100
1975 Honda SB550T "Clubman"
1981 Kawasaki KZ1000J
1985 Suzuki GS550E
1978 Yamaha 650 Special
|
|
|
|
| narsisco_lopez | | Thor | | | | Reg. Date | : | 09/09/2010 | | Posts | : | 2,765 | | Location | : | Golden (Showers!), Colorado, United States |
|
| | Posted : 17 Mar 2011 - 15:56 Post title : Re: How to Install an HID/Bi-Xenon Light Kit | | | lwc1600 wrote:
 Did you remove only the silver cap or the entire reflector ? Did you remove only the silver cap or the entire reflector ? |
|
I removed the ENTIRE reflector. Again, it doesn't effect the amount of 'forward' light at all, but does increase the amount of "side" light by a big factor... kinda like having fog lights on: the view on each side of the bike is greatly-improved.
| 2012 Storm (SOLD!)
Other Bikes:
2003 Suzuki DRZ400E (plated - my dual sport/mountain trail/camping bike)
Past Bikes:
2012 K13S
2009 KTM 990 Adventure
2010 Triumph Thunderbird 1600 (the Alien Queen)
2009 Triumph Sprint ST (another great bike!)
2007 Kawasaki ZX10R
2000 Kawasaki ZRX1100
1975 Honda SB550T "Clubman"
1981 Kawasaki KZ1000J
1985 Suzuki GS550E
1978 Yamaha 650 Special
|
|
|
|
| lwc1600 | | Set | |  | | Reg. Date | : | 05/03/2010 | | Posts | : | 114 | | Location | : | Lakeland, Florida, United States |
|
| | Posted : 21 Mar 2011 - 18:08 Post title : Re: How to Install an HID/Bi-Xenon Light Kit (Re: narsisco_lopez) | | | Well I finally got the mini screws removed and the reflector off. Installing the screws back in the lock ring was another big pain in the ass but its done . Will ride tonight and hopefully see that it was worth all the trouble.
Thanks again for all your help !!!!!!! The tank rebadge project is next.
|
|
|
|
| Gala | | Set | |  | | Reg. Date | : | 12/05/2012 | | Posts | : | 81 | | Location | : | Australia |
|
| | Posted : 04 Jul 2012 - 09:09 Post title : Re: How to Install an HID/Bi-Xenon Light Kit (Re: lwc1600) | | | I already had the OEM lightbar foglights fitted so space was taken up inside the headlight cowl. So decided to just go with non-HID Xenon Super White / Blue 5000 Kelvin for headlight and non-HID Xenon Artic White 3800 Kelvin for fog/spots. Vast improvment over standard halogens.
Although not 'real' full HID +7000 Kelvin I can't pick the difference ...extremely blue/white & I swear I have picked up 20M beam road distance. Nice option if you don't desire to go the full HID intsal I guess
|
|
|
|
| alanp | | Set | |  | | Reg. Date | : | 22/08/2011 | | Posts | : | 74 | | Location | : | United Kingdom |
|
| | Posted : 04 Jul 2012 - 11:21 Post title : Re: How to Install an HID/Bi-Xenon Light Kit (Re: narsisco_lopez) | | | Just a cautionary word needed here chaps.
Unless the OEM headlight reflector has been specifically designed for use with HID bulbs YOU will find better lighting of the road ahead BUT EVERYONE COMING TOWARDS YOU will curse the dazzle they get from your light which is scattering light in directions.
Just check the web site mentioned and read the disclaimer, it's not there for fun.
In the UK (at least) they are illegal unless supplied by the original bike/car manufacturer together with the correct system to avoid dangerous dazzle to other road users.
Taking off the bulb shields make this worse.
I once fitted them to my BMW K1200R and was impressed by the improvement but my riding mates complained that when following them the brightness in their mirrors was dangerous even when on dipped beam, also coming up behind cars I used to get displays of annoyance as well as flashes from oncoming cars. It was taken off.
The conversion may be ok for riding across the Nevada or Australian wilderness but not for mixing it up with traffic.
It's much preferred and better for everyone to fit the better bulbs mentioned above.
| Jennicliff Cafe Rocker
|
|
|
|
| JDee | | Set | |  | | Reg. Date | : | 06/02/2011 | | Posts | : | 152 | | Location | : | Central Coast, NSW., Australia |
|
| | Posted : 05 Jul 2012 - 12:45 Post title : Re: How to Install an HID/Bi-Xenon Light Kit (Re: Gala) | | |
Gala wrote:
I already had the OEM lightbar foglights fitted so space was taken up inside the headlight cowl. So decided to just go with non-HID Xenon Super White / Blue 5000 Kelvin for headlight and non-HID Xenon Artic White 3800 Kelvin for fog/spots. Vast improvment over standard halogens.
Although not 'real' full HID +7000 Kelvin I can't pick the difference ...extremely blue/white & I swear I have picked up 20M beam road distance. Nice option if you don't desire to go the full HID intsal I guess |
|
Hey Gala'h' ????
I've been considering upgrading the orig lighting as it is pretty useless IMHO....
I have the same set up as u with the OEM driving lights
Just asking where did u get the new/better bulbs from..?????
And do u have to upgrade relays or anything..????
Cheers
|
|
|
|
| Gala | | Set | | | | Reg. Date | : | 12/05/2012 | | Posts | : | 81 | | Location | : | Australia |
|
| | Posted : 06 Jul 2012 - 04:31 Post title : Re: How to Install an HID/Bi-Xenon Light Kit (Re: JDee) | | | JDee you can source these bulbs from many places even ebay
Heres one place I have brought from before
Link
No you do not need to alter , mod , upgrade anything the are still 12V/55W bulbs (they are just Xenon instead of Halogen)
They burn at a colour temperaure hotter than halogen but lower than true HV HID , without drawing any significant extra power.
Althouh TBH like I said in my original post with the headlight at least I really can't tell difference between the Xenon I have & real HID. It still looks extremely blue / white bright & lights significantly more road ahead.
The foglights (being H3) bulb are just under 4k Kelvin from memory so they are still in the artic-white range , but | blue/white, still a significant improvement over standard H3 halogen drab yellow beam. If you want the blue beams in a H3 fog configuration you will likely need to go real HV HID to achieve that.
These Xenon are a compromise, better than halogen , just as good as HID in blue range , but of course if you want searing blue , purple , violet then you definately have to go full HV ballasted HID.
|
|
|
|
| JDee | | Set | | | | Reg. Date | : | 06/02/2011 | | Posts | : | 152 | | Location | : | Central Coast, NSW., Australia |
|
| | Posted : 12 Jul 2012 - 11:44 Post title : Re: How to Install an HID/Bi-Xenon Light Kit (Re: Gala) | | |
Thanks for the info Justin, 
I'll take your word and get me some of them....
Cheers
|
|
|
|
| TBirdgirl | | Set | | | Reg. Date | : | 29/04/2012 | | Posts | : | 12 | | Location | : | United States |
|
| | Posted : 09 Oct 2012 - 20:36 Post title : Re: How to Install an HID/Bi-Xenon Light Kit (Re: alanp) | | | Word. That's what's been keeping me from installing a kit like this. I'll hold out for a kit with a projector meant for a hid bulb that will fit inside the nacelle.
Edit: Just read Gala's post above, and I'm going to try the xenon h4 bulbs first. I wonder about the longevity of those...
| | Post edited by TBirdgirl on 09 Oct 2012 - 20:39 |
|
|
|
| narsisco_lopez | | Thor | | | | Reg. Date | : | 09/09/2010 | | Posts | : | 2,765 | | Location | : | Golden (Showers!), Colorado, United States |
|
| | Posted : 10 Oct 2012 - 00:38 Post title : Re: How to Install an HID/Bi-Xenon Light Kit (Re: TBirdgirl) | | | Ok, I hate to start crap when I don't even own a 'Bird anymore, but since I started this thread after installing the HID kit, I figure I can comment...
I personally think you're all over-thinking this. The stock nacelle is NEVER going to give you superior lighting as compared to light housings specifically-designed for superior lighting. If lighting up the night road like a UFO is a high priority, then you should be looking into dimmable LED driving light technology.
But... I can tell you from personal experience that even the el cheapo HID bulb/ballast I installed above is VASTLY-SUPERIOR to the stock bulb and the night time light it delivers is more than enough to safely light up even the darkest roads.
I know our British 'Birder Brethren above commented about pissing off on-coming cagers (they must have overly-sensitive rods and cones on that side of the pond), but I highly doubt I ever blinded anyone when riding at night... even with the high-beam on.
In the time since I installed the HIDCountry kit above, I've sold the 'Bird and put my disposable income into my KTM 990 Adventure. One of the very first upgrades I did was to swap the US headlight housing for the EU version (going from a H4 high/low to a H3/H7 dual bulb housing). At the same time, I also installed a DDM HID bulb/ballast kit. I can tell you that the overall quality of the bulbs and ballast from DDM is MUCH BETTER than others I've used (HIDCountry included).
If anyone is serious about an HID upgrade, you should compare DDM to the competition.
| 2012 Storm (SOLD!)
Other Bikes:
2003 Suzuki DRZ400E (plated - my dual sport/mountain trail/camping bike)
Past Bikes:
2012 K13S
2009 KTM 990 Adventure
2010 Triumph Thunderbird 1600 (the Alien Queen)
2009 Triumph Sprint ST (another great bike!)
2007 Kawasaki ZX10R
2000 Kawasaki ZRX1100
1975 Honda SB550T "Clubman"
1981 Kawasaki KZ1000J
1985 Suzuki GS550E
1978 Yamaha 650 Special
|
|
|
|
| FTL40 | | Jupiter | |  | | Reg. Date | : | 13/10/2009 | | Posts | : | 1,122 | | Location | : | massachusetts, United States |
|
| | Posted : 10 Oct 2012 - 02:38 Post title : Re: How to Install an HID/Bi-Xenon Light Kit (Re: narsisco_lopez) | | | thats the kit i used
| 2010 tbird 1700 silver (fastest color) BC exhaust, BC airbox removal
|
|
|
|
| HooRad | | Set | |  | | Reg. Date | : | 19/01/2010 | | Posts | : | 280 | | Location | : | Richmond, VA, United States |
|
| | Posted : 10 Oct 2012 - 17:51 Post title : Re: How to Install an HID/Bi-Xenon Light Kit (Re: FTL40) | | | So which bulb type and bulb color do you recommend with that kit? Obviously I want the higher 55 watt bulb, but unsure about the other parameters.
| Not likely to die of natural causes. At least I hope not.
|
|
|
|
| narsisco_lopez | | Thor | | | | Reg. Date | : | 09/09/2010 | | Posts | : | 2,765 | | Location | : | Golden (Showers!), Colorado, United States |
|
| | Posted : 11 Oct 2012 - 14:41 Post title : Re: How to Install an HID/Bi-Xenon Light Kit (Re: HooRad) | | | HooRad wrote:
So which bulb type and bulb color do you recommend with that kit? Obviously I want the higher 55 watt bulb, but unsure about the other parameters. |
|
The bulb type just matches up with the Thunderbird bulb type... which is an H4.
You might want to stay in the 5000-6000K (Kelvin) range. Anything higher and you'll get into excessive blue/purple colors and the amount of actual light drops way off. I put a 6000K in both my 'Bird and my KTM 990A and am really happy with that temperature's light output and look.
Like I said above, I've now used both the HIDCountry and DDM Tuning kits and feel the DDM Tuning kit is a much better quality kit and easier to install. The biggest challenge you have installing the kit on the 'Bird is organizational: wrapping the cords/ballast in a neat way as to fit into the nacelle and you'll have to either run the power lead to the battery or tap into the power at the harness up front... no biggie.


| 2012 Storm (SOLD!)
Other Bikes:
2003 Suzuki DRZ400E (plated - my dual sport/mountain trail/camping bike)
Past Bikes:
2012 K13S
2009 KTM 990 Adventure
2010 Triumph Thunderbird 1600 (the Alien Queen)
2009 Triumph Sprint ST (another great bike!)
2007 Kawasaki ZX10R
2000 Kawasaki ZRX1100
1975 Honda SB550T "Clubman"
1981 Kawasaki KZ1000J
1985 Suzuki GS550E
1978 Yamaha 650 Special
|
|
|
|
| FTL40 | | Jupiter | | | | Reg. Date | : | 13/10/2009 | | Posts | : | 1,122 | | Location | : | massachusetts, United States |
|
| | Posted : 11 Oct 2012 - 18:27 Post title : Re: How to Install an HID/Bi-Xenon Light Kit (Re: HooRad) | | | u went with i believe 6k 35w and could not be happier. the 55w can get a bit hot and with the limited space i did not want any issues
| 2010 tbird 1700 silver (fastest color) BC exhaust, BC airbox removal
|
|
|
|
| stripygitface | | Set | | | Reg. Date | : | 31/08/2010 | | Posts | : | 132 | | Location | : | Rochester, Kent, United Kingdom |
|
| | Posted : 17 Aug 2013 - 17:59 Post title : Re: How to Install an HID/Bi-Xenon Light Kit (Re: narsisco_lopez) | | | Just finished fitting a HID kit supplied by HID City, who.where very very helpfull, and i would recommend their extension cable kit for fitting to the Bird, as it allows you to fit everything in the left side pod, and under the seat, so that all of the guts are not squeezed into the nacelle. The light looks brighter in my shed, and will try in the dark tomorrow night. The only mistake I made was not taking photos for you guys to see how it was done. It is too late now, as most of the kit has been installed out of sight, however, I am really happy that the whole system as it looks factory fitted.
|
|
|
|
| Duty_First | | Set | |  | | Reg. Date | : | 15/03/2013 | | Posts | : | 64 | | Location | : | Adelaide, SA, Australia |
|
| | Posted : 22 Aug 2013 - 21:32 Post title : Re: How to Install an HID/Bi-Xenon Light Kit (Re: stripygitface) | | |
stripygitface wrote:
Just finished fitting a HID kit supplied by HID City, who.where very very helpfull, and i would recommend their extension cable kit for fitting to the Bird, as it allows you to fit everything in the left side pod, and under the seat, so that all of the guts are not squeezed into the nacelle. The light looks brighter in my shed, and will try in the dark tomorrow night. The only mistake I made was not taking photos for you guys to see how it was done. It is too late now, as most of the kit has been installed out of sight, however, I am really happy that the whole system as it looks factory fitted. |
|
What brand/model did you use??
| 'Brothers by Choice'
|
|
|
|
| stripygitface | | Set | | | Reg. Date | : | 31/08/2010 | | Posts | : | 132 | | Location | : | Rochester, Kent, United Kingdom |
|
| | Posted : 23 Aug 2013 - 07:54 Post title : Re: How to Install an HID/Bi-Xenon Light Kit (Re: Duty_First) | | |
Duty_First wrote:
stripygitface wrote:
Just finished fitting a HID kit supplied by HID City, who.where very very helpfull, and i would recommend their extension cable kit for fitting to the Bird, as it allows you to fit everything in the left side pod, and under the seat, so that all of the guts are not squeezed into the nacelle. The light looks brighter in my shed, and will try in the dark tomorrow night. The only mistake I made was not taking photos for you guys to see how it was done. It is too late now, as most of the kit has been installed out of sight, however, I am really happy that the whole system as it looks factory fitted. |
|
What brand/model did you use?? |
|
Unfortunately I don't know how to post a link in this reply (HELP, somebody please), but the kit was from www.hidcity.co.uk, look at the Bike Kits, I bought the H4 Kit, and having spoken to 'John' from HID City I also bought their extension cable kit, so I could remotely mount the controllers etc. John from HID City was extremely helpful when I spoke to him.
I have now tried it in the dark, and all I can say is this is the light the bikes should be supplied with from Triumph, it makes such a difference, I am now riding at similar speeds in the dark as in the light, because I can actually see the road ahead!
|
|
|
|
| mat1600 | | Thunderbird | |  | | Reg. Date | : | 06/03/2010 | | Posts | : | 8,596 | | Location | : | Bridlington, Democratic Independant State of Yorkshire, United Kingdom |
|
| | Posted : 23 Aug 2013 - 12:49 Post title : Re: How to Install an HID/Bi-Xenon Light Kit (Re: stripygitface) | | | It's realy easy to post a link. go to the site you want . Find the page on the site. If you look at the very top of the screen there is a box with the letters http...... - just right click on it and select 'copy' then go back to you forum post and right click again on the new post and select 'paste'.
Link
It will paste as a long string of words, but when you submit your post it will just say link (as above) in blue.
Thanks for the post. I am looking in to fitting this kit.
I have the bigger speedy h/light so I am hoping to get all the wiring into the h/light bucket. Do you think it will fit ?
| My first natural instinct is to breathe. My second is to evade tax's.
| | Post edited by mat1600 on 23 Aug 2013 - 12:52 |
|
|
|
| stripygitface | | Set | | | Reg. Date | : | 31/08/2010 | | Posts | : | 132 | | Location | : | Rochester, Kent, United Kingdom |
|
| | Posted : 24 Aug 2013 - 07:44 Post title : Re: How to Install an HID/Bi-Xenon Light Kit (Re: mat1600) | | |
mat1600 wrote:
It's realy easy to post a link. go to the site you want . Find the page on the site. If you look at the very top of the screen there is a box with the letters http...... - just right click on it and select 'copy' then go back to you forum post and right click again on the new post and select 'paste'.
Link
It will paste as a long string of words, but when you submit your post it will just say link (as above) in blue.
Thanks for the post. I am looking in to fitting this kit.
I have the bigger speedy h/light so I am hoping to get all the wiring into the h/light bucket. Do you think it will fit ? |
|
Matt, thanks for the help I will give it a try next time.
I think that you probably would be able to fit the guts within the Speedy headlight, because in reality I could have squeezed it into the standard housing, but i was concerned about not being able to fix things securely, and heat build up. The advantage of fitting into the headlight housing, is that although HID City say you need a permanent 12v supply to the ballast, i tried connecting the permanent 12v supply cables to the sidelight /parking light cables, as these will always be live with the ignition on, and the kit worked fine, which means that if i had gone down this installation route i would not have had to run back to the battery.
If the weather improves, i'll get the bike out over the weekend i will try and take some photos to show you how neatly the kit can be fitted within the side pod, and under the seat, without the need to jam everything into one place.
|
|
|
|
| Duty_First | | Set | | | | Reg. Date | : | 15/03/2013 | | Posts | : | 64 | | Location | : | Adelaide, SA, Australia |
|
| | Posted : 24 Aug 2013 - 09:54 Post title : Re: How to Install an HID/Bi-Xenon Light Kit (Re: stripygitface) | | | Stripygitface it sounds good and I am looking forward to seeing your photos of the fit as I will be doing it as soon as mine arrives from the US.
| 'Brothers by Choice'
|
|
|
|
| tigerbrew | | Set | |  | | Reg. Date | : | 08/11/2011 | | Posts | : | 100 | | Location | : | Bridlington, East Yorkshire, United Kingdom |
|
| | Posted : 24 Aug 2013 - 12:55 Post title : Re: How to Install an HID/Bi-Xenon Light Kit (Re: narsisco_lopez) | | | NL wrote....
You might want to stay in the 5000-6000K (Kelvin) range. Anything higher and you'll get into excessive blue/purple colors and the amount of actual light drops way off. I put a 6000K in both my 'Bird and my KTM 990A and am really happy with that temperature's light output and look.
I would go with that.... One yellow candle will give off more light than an entire boiler burner with its blue flame.
Once you get to the top end of the white spectrum and start heading white/blue, light output diminishes.
| That that is, is. That that is not, is not. Is not that so?.
Four Wheels Move The Body, Two Wheels Move The Soul.
| | Post edited by tigerbrew on 24 Aug 2013 - 13:05 |
|
|
|
| stripygitface | | Set | | | Reg. Date | : | 31/08/2010 | | Posts | : | 132 | | Location | : | Rochester, Kent, United Kingdom |
|
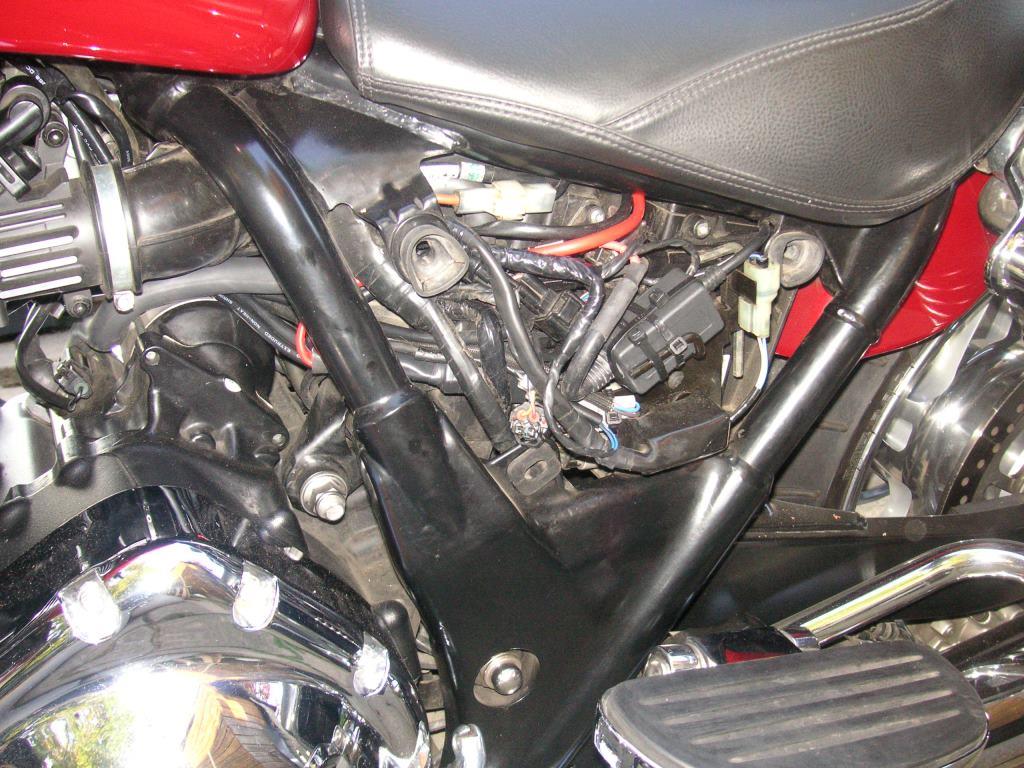
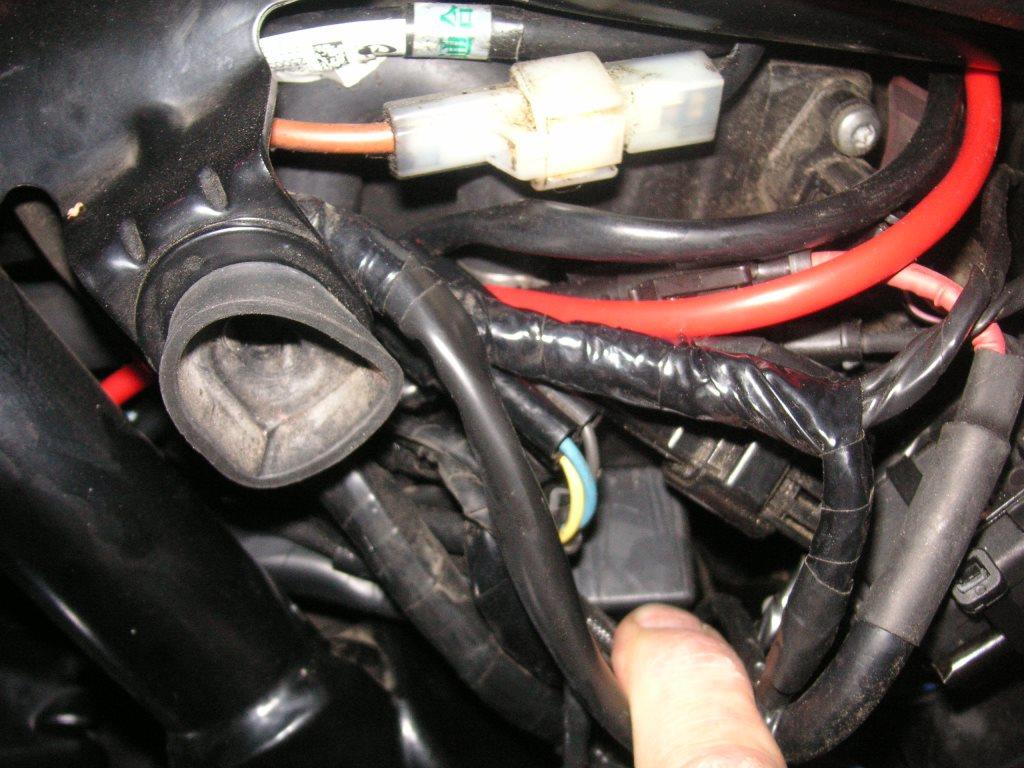
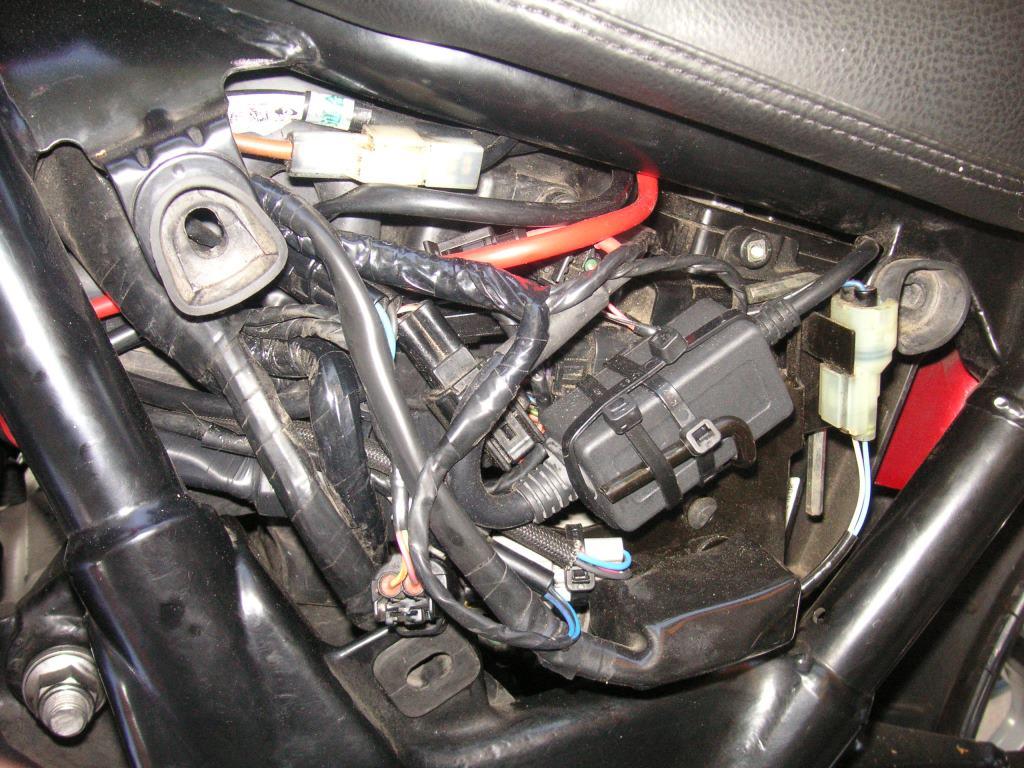
| | Posted : 05 Sep 2013 - 06:01 Post title : Re: How to Install an HID/Bi-Xenon Light Kit (Re: stripygitface) | | | I have finally got round to taking some photos of the install. However, I wasn't going to take the seat off, and lift the tank, so i'll try to explain the gaps:
The extension cable kit allows all of the gubbins to be located within the side Pod / under the seat, so I followed the factory cable routes from the headlight back:
Some Shots of the wiring and control equipment within the Side Pod. The control relay is mounted behind a lot of other wiring, but in 1 photo can be seen, where pointed out by my finger.
The cables which run up and under the seat, are the Power Supply cables, and also go to the ballast unit, which I have sat on top of the battery, and held in place with the rubber battery retainer.
|
|
|
|
| ThunderRat | | Jupiter | |  | | Reg. Date | : | 08/03/2010 | | Posts | : | 1,056 | | Location | : | Castle Hill, NSW, Australia |
|
| | Posted : 05 Sep 2013 - 10:04 Post title : Re: How to Install an HID/Bi-Xenon Light Kit (Re: stripygitface) | | | Just out of curiosity what is it costing to do the conversion? I have seen a high quality billet light which is a HID for sale at around $400 Aus so would think it may be cheaper in the UK or States.
| "I started life with nothing and still have most of it left"
|
|
|
|
| stripygitface | | Set | | | Reg. Date | : | 31/08/2010 | | Posts | : | 132 | | Location | : | Rochester, Kent, United Kingdom |
|
| | Posted : 05 Sep 2013 - 10:38 Post title : Re: How to Install an HID/Bi-Xenon Light Kit (Re: ThunderRat) | | |
ThunderRat wrote:
Just out of curiosity what is it costing to do the conversion? I have seen a high quality billet light which is a HID for sale at around $400 Aus so would think it may be cheaper in the UK or States. |
|
The HID City kit is ??68.99, and the extension cable kit is ??15.00 + Carriage.
However I spoke to John at HID City, and negotiated the kit and extension cable to ??76.00 with free delivery. The day after ordering it, John phoned to say he was about to dispatch my kit, but he had run out of packing boxes with the pretty pictures on them, if I don't need the box, then he would post in a plain packet, and knock off a couple of extra pounds.
The only other potential costs would be some cable ties and heatshrink (I used it to make sure all connections were water tight), which I had at home anyway.
The whole installation taking your time, and being careful can be done in 2 - 3 hours
|
|
|