|  | Topic : Rear Wheel Alignment. So easy, "even a caveman (with a lathe) can do it." |  |
| | | VABird | | Jupiter |  |  | | Reg. Date | : | 28/09/2014 | | Posts | : | 1,373 | | Location | : | BEDFORD, Virginia, United States |
|
| | Posted : 28 Jan 2020 - 14:32 Post title : Rear Wheel Alignment. So easy, "even a caveman (with a lathe) can do it." | | | Over the years of ownership, I've been supremely annoyed with the belt chirp and rapid tire wear on my T-Bird, both of which can in part be attributed to rear wheel misalignment. After no small amount of reading on the forums, I found one poster that said he went through intricate measurements of swing arm bolt to axle bolt, only to find that once the same, ensuring that the two were parallel, the axle bolt to the back of swing arm flat (that the adjuster nuts rest on) is also the same. From this premise, a simple solution was born; that is to permanently mount a device that can accurately measure the distance from the axle bolt to the back of swing arm. Dimension can be checked and adjustment can be made without removing panniers, mufflers or belt guard.
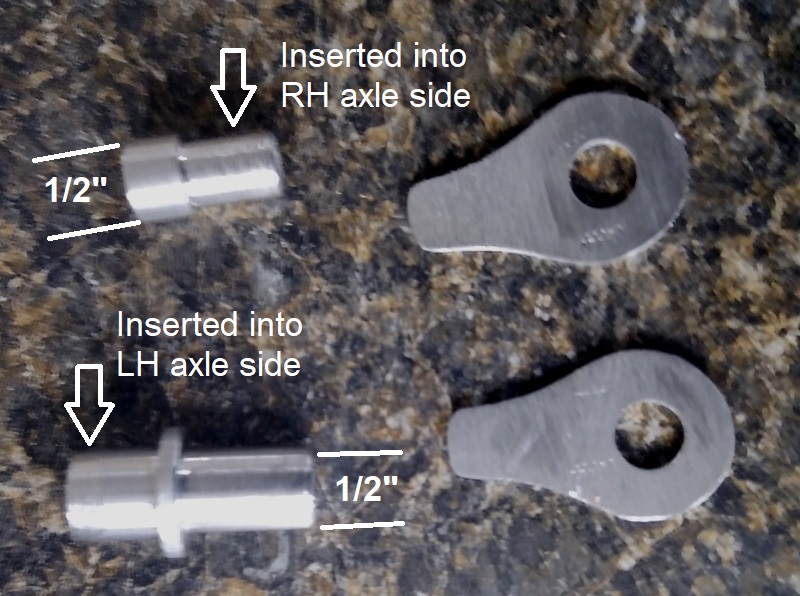
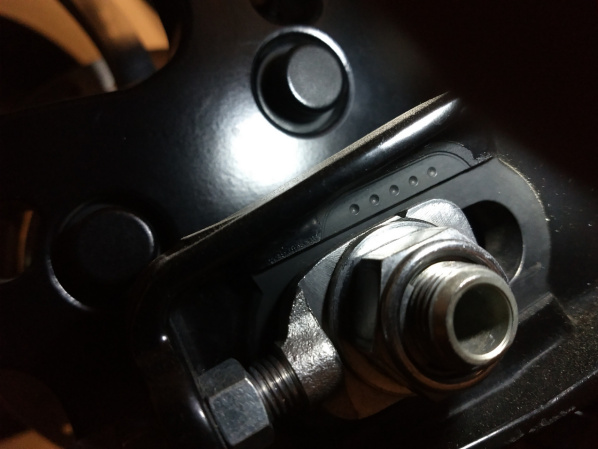
Attached are pics that'll demonstrate the solution. The main thing to consider is that the diameter of the portion of the parts that protrude from the axle sides be identical, (in this case, 1/2") left and right. That ensures that that dimension is accurate to that flat surface.
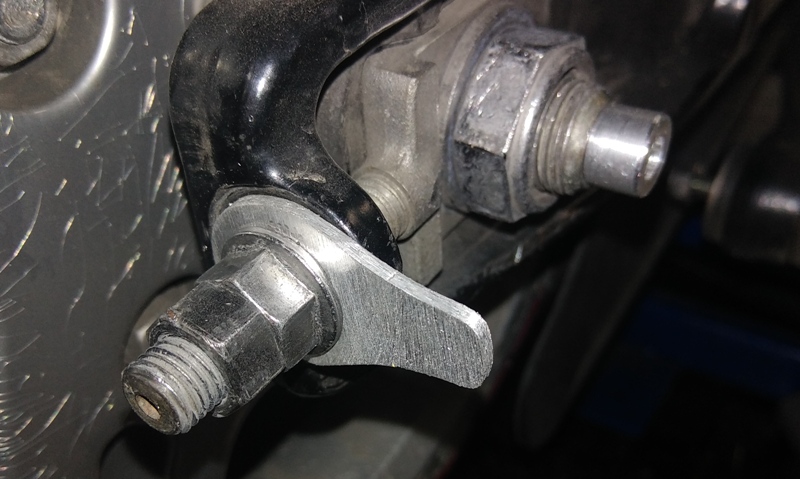
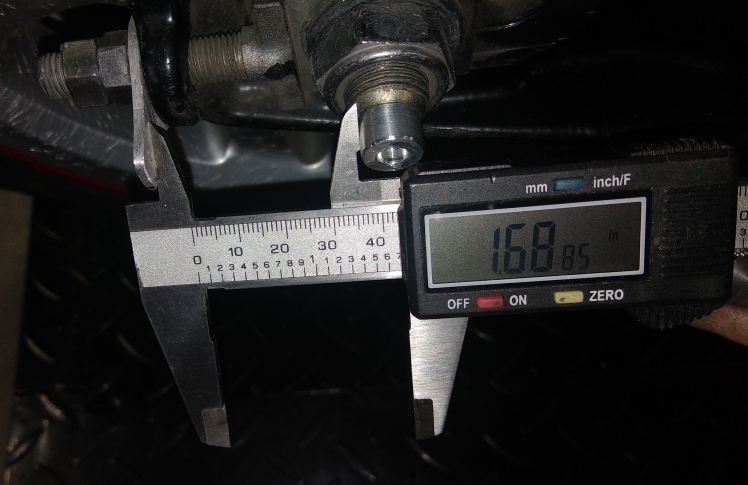
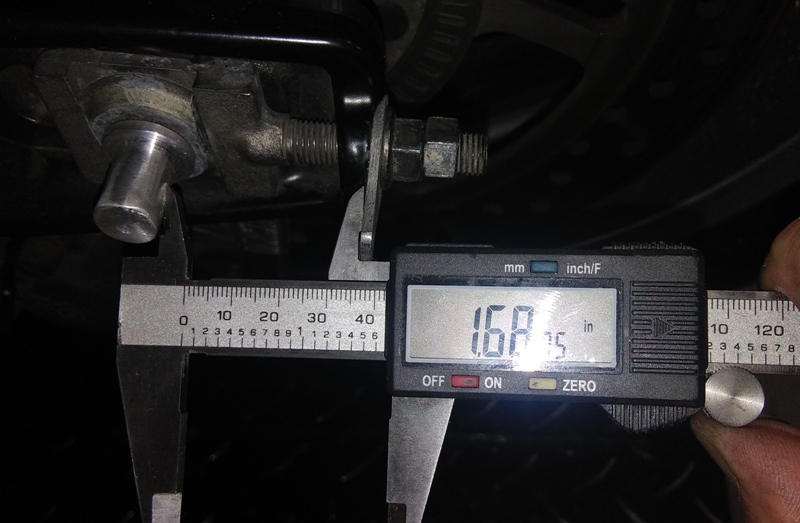
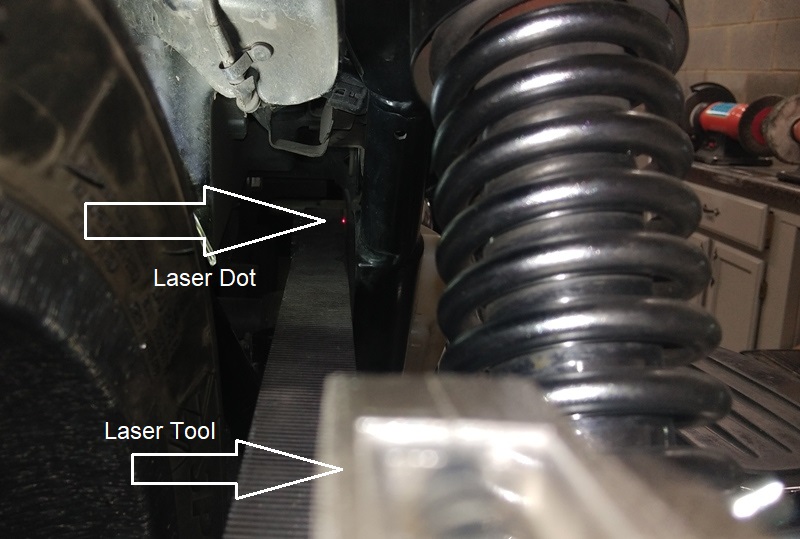
1st pic is individual parts. 2nd pic is RH side installed; a "friction fit" (hammered into place!). 3rd & 4th pics show measurements within .001 inch, something unattainable using other methods, including laser. 5th pic shows with a laser pointer, at least as accurate as the laser can be, that the method is true.
Although it has not completely eliminated the chirp, it has reduced it by 2/3, so now I need to focus on belt tension.
| The ride may be fun, but in the Great Scheme of things, it really is about the destination! John 3:16 
| | Post edited by VABird on 28 Jan 2020 - 15:50 |
|
| | | MotorMac | | Jupiter | |  | | Reg. Date | : | 29/08/2010 | | Posts | : | 1,787 | | Location | : | Nor Cal, United States |
|
| | Posted : 28 Jan 2020 - 16:31 Post title : Re: Rear Wheel Alignment. So easy, "even a caveman (with a lathe) can do it." (Re: VABird) | | | "Supremely annoyed" sums it up nicely. Mind if I quote you?
| 
|
|
| | | Hornet | | Jupiter | |  | | Reg. Date | : | 05/05/2013 | | Posts | : | 1,294 | | Location | : | United States |
|
| | Posted : 28 Jan 2020 - 18:37 Post title : Re: Rear Wheel Alignment. So easy, "even a caveman (with a lathe) can do it." (Re: VABird) | | | So simple, brilliant.
So here's the $64 dollar question, with this precise measurement where is the belt riding, left, center, right.
Lastly, have you remeasured after a ride?
| You'll never be first but you might be next
2014 Commander
|
|
| | | daz | | Zeus | |  | | Reg. Date | : | 12/05/2009 | | Posts | : | 7,684 | | Location | : | United States |
|
| | Posted : 28 Jan 2020 - 19:13 Post title : Re: Rear Wheel Alignment. So easy, "even a caveman (with a lathe) can do it." (Re: Hornet) | | | I've done basically the same thing but for me it didn't work well because no matter how i set the caliper i would get a slightly different reading every time and the tiny amount it would be off by was enough to change where the belt rode. I would set the caliper in a way that would steady it up against something where u would think theres no way it would read different if you tried several times, but it still did. I think each bike is different than the next as to how sensitive it is to adjustment and mine is wacky even with mats adjusters.
The thing that finally worked was getting it perfect thru the tedious regular method and then never touching the adjusters after that. Wheel removal/reinstall is easily done without unlocking the adjusters. After a few times it can go off a tad, but it takes the slightest bit of movement in the proper direction to set it right again. So maybe every few tries i have to do a ever so slight adjustment and moving the nut as little as possible usually results in the alignment being right again w/o further tries.
| 2010 Blue/White Thunderbird, "Brutus". 1700 kit, short tors, gutted cat, UNI filter, filter seal off, custom tune. Brutus in his native habitat: Link
|
|
| | | VABird | | Jupiter | | | | Reg. Date | : | 28/09/2014 | | Posts | : | 1,373 | | Location | : | BEDFORD, Virginia, United States |
|
| | Posted : 28 Jan 2020 - 19:24 Post title : Re: Rear Wheel Alignment. So easy, "even a caveman (with a lathe) can do it." (Re: MotorMac) | | |
| MotorMac wrote: "Supremely annoyed" sums it up nicely. Mind if I quote you? |
|
You just did!
| The ride may be fun, but in the Great Scheme of things, it really is about the destination! John 3:16
|
|
| | | VABird | | Jupiter | | | | Reg. Date | : | 28/09/2014 | | Posts | : | 1,373 | | Location | : | BEDFORD, Virginia, United States |
|
| | Posted : 28 Jan 2020 - 19:27 Post title : Re: Rear Wheel Alignment. So easy, "even a caveman (with a lathe) can do it." (Re: Hornet) | | | Hornet wrote: So simple, brilliant. So here's the $64 dollar question, with this precise measurement where is the belt riding, left, center, right.
Lastly, have you remeasured after a ride? |
|
Belt is riding to the right side of the pulley.
I did remeasure, and snug it up (twice-incrementally) a bit more (.024"). Squeak is GONE!
This is my first belt drive bike. I was always used to having 35-40 MM slack in a chain, so found it hard to accept that the belt needed to be so tight.
But now with the wheel aligned and belt tightened, all is good and I've fallen in love again!
| The ride may be fun, but in the Great Scheme of things, it really is about the destination! John 3:16
| | Post edited by VABird on 28 Jan 2020 - 20:50 |
|
| | | Spudo769 | | Set | | | Reg. Date | : | 08/12/2015 | | Posts | : | 22 | | Location | : | United States |
|
| | Posted : 29 Jan 2020 - 16:30 Post title : Re: Rear Wheel Alignment. So easy, "even a caveman (with a lathe) can do it." (Re: VABird) | | | That looks simple and great! Are you going to sell these?
|
|
| | | MotorMac | | Jupiter | | | | Reg. Date | : | 29/08/2010 | | Posts | : | 1,787 | | Location | : | Nor Cal, United States |
|
| | Posted : 29 Jan 2020 - 17:18 Post title : Re: Rear Wheel Alignment. So easy, "even a caveman (with a lathe) can do it." (Re: VABird) | | | I did a rant about this long ago (as most of us have), and two things stand out:
Using a bore gauge instead of calipers makes measuring much faster and easier, with factory tool or method above.
When shown the process on a Hardly Dangerous, I saw how simple it can be. They have a tiny hole drilled on each side of swingarm which is measured against tiny holes in each end of axle. Duh! You can do it with a piece of wire.
|
|
|
| | | davetac1 | | Thunderbird | | | Reg. Date | : | 06/09/2010 | | Posts | : | 8,379 | | Location | : | Haverhill, Ma., United States |
|
| | Posted : 29 Jan 2020 - 18:15 Post title : Re: Rear Wheel Alignment. So easy, "even a caveman (with a lathe) can do it." (Re: MotorMac) | | | At the suggestion of my cousin who went to HD school in California,then successfully worked for a HD dealer in California,I used a laser on my Tbird to get that belt right,the first time and anytime after when I changed that back tire,which was quite often,and never looked back.It was right on the money,the first time and every time after ,hence I never had any more belt noise.It was the best 40 bucks I ever spent!!
| | Post edited by davetac1 on 29 Jan 2020 - 18:18 |
|
| | | VABird | | Jupiter | | | | Reg. Date | : | 28/09/2014 | | Posts | : | 1,373 | | Location | : | BEDFORD, Virginia, United States |
|
| | Posted : 29 Jan 2020 - 23:28 Post title : Re: Rear Wheel Alignment. So easy, "even a caveman (with a lathe) can do it." (Re: Spudo769) | | |
| Spudo769 wrote: That looks simple and great! Are you going to sell these? |
|
For the amount of time it'd take to make one set at a time, it'd cost too much.
If I got about 20 commitments, I could have the CNC shop that makes JBQ's make some.
Don't know the price yet, but guess $25-$30 ish?
Agree that a bore gauge (inside micrometer) would be better.
| The ride may be fun, but in the Great Scheme of things, it really is about the destination! John 3:16
|
|
| | | Dags | | Set | |  | | Reg. Date | : | 01/11/2013 | | Posts | : | 468 | | Location | : | N.S.W, Australia |
|
| | Posted : 30 Jan 2020 - 08:45 Post title : Re: Rear Wheel Alignment. So easy, "even a caveman (with a lathe) can do it." (Re: VABird) | | | May I enquire both L and R side measurements between your inserts and the small machined block section towards the front of the swing arm.
Many thanks.
| Dags
|
|
| | | VABird | | Jupiter | | | | Reg. Date | : | 28/09/2014 | | Posts | : | 1,373 | | Location | : | BEDFORD, Virginia, United States |
|
| | Posted : 30 Jan 2020 - 19:28 Post title : Re: Rear Wheel Alignment. So easy, "even a caveman (with a lathe) can do it." (Re: Dags) | | | Dags wrote:
May I enquire both L and R side measurements between your inserts and the small machined block section towards the front of the swing arm.
Many thanks. |
|
3.002" LH
3.705" RH
| The ride may be fun, but in the Great Scheme of things, it really is about the destination! John 3:16
| | Post edited by VABird on 30 Jan 2020 - 19:28 |
|
| | | GerPa | | Jupiter | |  | | Reg. Date | : | 10/12/2011 | | Posts | : | 1,919 | | Location | : | Mackay, Central Queensland, Australia |
|
| | Posted : 31 Jan 2020 - 04:47 Post title : Re: Rear Wheel Alignment. So easy, "even a caveman (with a lathe) can do it." (Re: VABird) | | |
VABird wrote:
Over the years of ownership, I've been supremely annoyed with the belt chirp and rapid tire wear on my T-Bird, both of which can in part be attributed to rear wheel misalignment. After no small amount of reading on the forums, I found one poster that said he went through intricate measurements of swing arm bolt to axle bolt, only to find that once the same, ensuring that the two were parallel, the axle bolt to the back of swing arm flat (that the adjuster nuts rest on) is also the same. From this premise, a simple solution was born; that is to permanently mount a device that can accurately measure the distance from the axle bolt to the back of swing arm. Dimension can be checked and adjustment can be made without removing panniers, mufflers or belt guard.
Attached are pics that'll demonstrate the solution. The main thing to consider is that the diameter of the portion of the parts that protrude from the axle sides be identical, (in this case, 1/2") left and right. That ensures that that dimension is accurate to that flat surface.
1st pic is individual parts. 2nd pic is RH side installed; a "friction fit" (hammered into place!). 3rd & 4th pics show measurements within .001 inch, something unattainable using other methods, including laser. 5th pic shows with a laser pointer, at least as accurate as the laser can be, that the method is true.
Although it has not completely eliminated the chirp, it has reduced it by 2/3, so now I need to focus on belt tension.
|
|
Bob. Great idea and it certainly simplifies things. As getting a set of Callipers in the RHS behind the muffler (even if your using shorties) needs you to be a contortionist. Forum Member Peter Hemming of Peteonkarra came up with a similar method of measuring except He didn't use the Little measuring tab that you have secured behind the front nut, He went straight to the back flat section of the swingarm that you are fastening them to.
Why those bloody Pommie engineers made both sides different has me absolutely beat, But that is Pommie Engineering and it is quite common across Pommie built bikes and I know as I have had a few and still got one of the old classics. And I think the dreaded Chirp is a lot worse on you continent than ours and I think one thing that contributes to that is lot of the residual crap ( Scurrier and Salt) that is left over from you winter road conditions.
1:Is it you intention to leave the 1/2" machine stubs captive in the axel permanently?
2:You could put a Captive nut on the Front side of Swing arm cavity that would help to Jack forward as well as backwards.
3:Tension wise I think most of us out here have settled on 18mm to 30mm Slack, We tend to err on the loose side, As I don't really think there is that much difference to a chain.
|  May-2011-1600, 20306 Tune, Mustang Vintage Solo Seat, Meerkat Cat Bypass, + Meerkat Modified Short TORS May-2011-1600, 20306 Tune, Mustang Vintage Solo Seat, Meerkat Cat Bypass, + Meerkat Modified Short TORS  ,K&N Air Cleaner,K&N Oil Filter, JBQ lifting system, Gold Plug Magnetic Sump Plug,Dart Fly screen, Rivco Risers, GiPro Gear Indicator, Breakaway Cruise Control, Avon ISO Grips, Scorpion Western Low Handlebars, Kury Switchblade Pegs, Garmin Zumo390LM,Michelin RC2 on Front RC 3 on ,Modified Rear Drive Pulley Hub Bearings (Mat1600/Alex4 Modification) Front Susp: Std & 7.5W Oil /126mm Air Gap & Rear:Hagon Nitro's with 26Kg/cm Springs + Lots of other "Bling" stuff. ,K&N Air Cleaner,K&N Oil Filter, JBQ lifting system, Gold Plug Magnetic Sump Plug,Dart Fly screen, Rivco Risers, GiPro Gear Indicator, Breakaway Cruise Control, Avon ISO Grips, Scorpion Western Low Handlebars, Kury Switchblade Pegs, Garmin Zumo390LM,Michelin RC2 on Front RC 3 on ,Modified Rear Drive Pulley Hub Bearings (Mat1600/Alex4 Modification) Front Susp: Std & 7.5W Oil /126mm Air Gap & Rear:Hagon Nitro's with 26Kg/cm Springs + Lots of other "Bling" stuff.
|
|
| | | Dags | | Set | | | | Reg. Date | : | 01/11/2013 | | Posts | : | 468 | | Location | : | N.S.W, Australia |
|
| | Posted : 31 Jan 2020 - 10:18 Post title : Re: Rear Wheel Alignment. So easy, "even a caveman (with a lathe) can do it." (Re: VABird) | | |
VABird wrote:
Dags wrote:
May I enquire both L and R side measurements between your inserts and the small machined block section towards the front of the swing arm.
Many thanks. |
|
3.002" LH
3.705" RH |
|
Cheers.
| Dags
|
|
| | | MotorMac | | Jupiter | | | | Reg. Date | : | 29/08/2010 | | Posts | : | 1,787 | | Location | : | Nor Cal, United States |
|
| | Posted : 31 Jan 2020 - 17:05 Post title : Re: Rear Wheel Alignment. So easy, "even a caveman (with a lathe) can do it." (Re: GerPa) | | | I'll say it again, don't use calipers, use a bore gauge. Measurements are irrelevant, object is to make distance the same. A bore gauge is a T-shaped device that makes the process easy.
As to why sides are different, it is to compensate for factory tool. Measurement on one side is from tool's shaft, the other side from tool's much larger wing nut.
|
|
|
| | | GerPa | | Jupiter | | | | Reg. Date | : | 10/12/2011 | | Posts | : | 1,919 | | Location | : | Mackay, Central Queensland, Australia |
|
| | Posted : 01 Feb 2020 - 00:32 Post title : Re: Rear Wheel Alignment. So easy, "even a caveman (with a lathe) can do it." (Re: MotorMac) | | | MotorMac wrote:
I'll say it again, don't use calipers, use a bore gauge. Measurements are irrelevant, object is to make distance the same. A bore gauge is a T-shaped device that makes the process easy.
As to why sides are different, it is to compensate for factory tool. Measurement on one side is from tool's shaft, the other side from tool's much larger wing nut. |
|
The difference from side to side is the " Cast Measurement Lug in the Swing arm " and why the Bloody Pommie Engineers could not design the swing arm end castings to be the same so that there are both in the same location.( My RHS Lug is approximately 3/4" further forward than the LHS ) Mystifies Me and many others. Hence the Large wing nut to compensate for the difference. Bobs Idea by going in the opposite direction eliminates that.
| May-2011-1600, 20306 Tune, Mustang Vintage Solo Seat, Meerkat Cat Bypass, + Meerkat Modified Short TORS ,K&N Air Cleaner,K&N Oil Filter, JBQ lifting system, Gold Plug Magnetic Sump Plug,Dart Fly screen, Rivco Risers, GiPro Gear Indicator, Breakaway Cruise Control, Avon ISO Grips, Scorpion Western Low Handlebars, Kury Switchblade Pegs, Garmin Zumo390LM,Michelin RC2 on Front RC 3 on ,Modified Rear Drive Pulley Hub Bearings (Mat1600/Alex4 Modification) Front Susp: Std & 7.5W Oil /126mm Air Gap & Rear:Hagon Nitro's with 26Kg/cm Springs + Lots of other "Bling" stuff.
| | Post edited by GerPa on 01 Feb 2020 - 00:38 |
|
| | | MotorMac | | Jupiter | | | | Reg. Date | : | 29/08/2010 | | Posts | : | 1,787 | | Location | : | Nor Cal, United States |
|
| | Posted : 01 Feb 2020 - 05:00 Post title : Re: Rear Wheel Alignment. So easy, "even a caveman (with a lathe) can do it." (Re: GerPa) | | | Difference side-to-side in distance to "cast measurement lugs" is exactly the same as offset in factory tool. Thus, measurement from lug to factory tool should be exactly the same on each side, if using factory tool as intended. One side is measured lug to tool shaft; the other is lug to tool's wing nut, with wing nut turned parallel to ground (wing = 3/4"). Arrows are measuring points to lugs which are staggered to compensate. Just trying to answer question here....
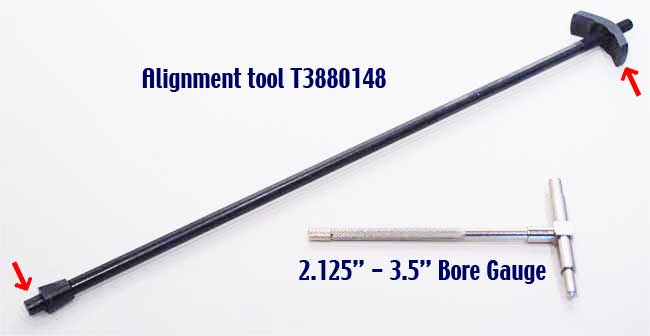
Bore gauge can replace calipers whether using factory tool - or - if measuring rearward using VABird's arrangement (just need a smaller Bore Gauge; the one shown works with factory tool). T-handle makes it easy to get measurment without gymnastics required by calipers or need of readout. Comparison is done by feel.
|
| | Post edited by MotorMac on 02 Feb 2020 - 00:44 |
|
| | | VABird | | Jupiter | | | | Reg. Date | : | 28/09/2014 | | Posts | : | 1,373 | | Location | : | BEDFORD, Virginia, United States |
|
| | Posted : 01 Feb 2020 - 12:27 Post title : Re: Rear Wheel Alignment. So easy, "even a caveman (with a lathe) can do it." (Re: GerPa) | | |
| GerPa wrote: :Is it you intention to leave the 1/2" machine stubs captive in the axel permanently? |
|
Yes. No reason to remove them.
| The ride may be fun, but in the Great Scheme of things, it really is about the destination! John 3:16
|
|
| | | VABird | | Jupiter | | | | Reg. Date | : | 28/09/2014 | | Posts | : | 1,373 | | Location | : | BEDFORD, Virginia, United States |
|
| | Posted : 01 Feb 2020 - 17:17 Post title : Re: Rear Wheel Alignment. So easy, "even a caveman (with a lathe) can do it." (Re: GerPa) | | |
GerPa wrote:
3:Tension wise I think most of us out here have settled on 18mm to 30mm Slack, We tend to err on the loose side, As I don't really think there is that much difference to a chain. |
|
Mine is now within factory tolerance of 6-7 MM. Any looser chirped!
| The ride may be fun, but in the Great Scheme of things, it really is about the destination! John 3:16
|
|
| | | Leethal | | Zeus | |  | | Reg. Date | : | 24/01/2011 | | Posts | : | 6,403 | | Location | : | Australia |
|
| | Posted : 02 Feb 2020 - 01:04 Post title : Re: Rear Wheel Alignment. So easy, "even a caveman (with a lathe) can do it." (Re: VABird) | | | Wow, it must be almost nothing when hot.
| Experience is something you get just after you needed it
1600,short tors, Meerkat bypass, Dyno tune, real headlight,plenty of chrome,switchblade pegs, Hagon Nitro shocks & Ikon progressive fork springs etc. Scorpion Western Low handlebars. PH adjustable fork caps.
|
|
| | | daz | | Zeus | | | | Reg. Date | : | 12/05/2009 | | Posts | : | 7,684 | | Location | : | United States |
|
| | Posted : 02 Feb 2020 - 02:28 Post title : Re: Rear Wheel Alignment. So easy, "even a caveman (with a lathe) can do it." (Re: Leethal) | | | I came to the same conclusion a couple years ago. Tightened it up to about triumph specs after years of running looser and chirp was gone or minimized and i even felt the bike felt better with the belt tighter.
| 2010 Blue/White Thunderbird, "Brutus". 1700 kit, short tors, gutted cat, UNI filter, filter seal off, custom tune. Brutus in his native habitat: Link
|
|
| | | Dags | | Set | | | | Reg. Date | : | 01/11/2013 | | Posts | : | 468 | | Location | : | N.S.W, Australia |
|
| | Posted : 02 Feb 2020 - 06:22 Post title : Re: Rear Wheel Alignment. So easy, "even a caveman (with a lathe) can do it." (Re: MotorMac) | | | MotorMac wrote:
I'll say it again, don't use calipers, use a bore gauge. Measurements are irrelevant, object is to make distance the same. A bore gauge is a T-shaped device that makes the process easy. |
|
Agree....and you can still use your 'calipers/verniers' to measure the bore gauge if you need to document the measurements.
| Dags
| | Post edited by Dags on 02 Feb 2020 - 06:23 |
|
| | | GerPa | | Jupiter | | | | Reg. Date | : | 10/12/2011 | | Posts | : | 1,919 | | Location | : | Mackay, Central Queensland, Australia |
|
| | Posted : 02 Feb 2020 - 08:45 Post title : Re: Rear Wheel Alignment. So easy, "even a caveman (with a lathe) can do it." (Re: MotorMac) | | | MotorMac wrote:
Bore gauge can replace calipers whether using factory tool - or - if measuring rearward using VABird's arrangement (just need a smaller Bore Gauge; the one shown works with factory tool). T-handle makes it easy to get measurment without gymnastics required by calipers or need of readout. Comparison is done by feel. |
|
Michael, I understand both methods very througherly and I cannot totally agree with you on the Bore Gauge. Coming from an Heavy Industrial Background I am well aware of what a bore gauge is and how to use it. IMO unless you come from an Engineering or a background involving Precision Measurements then the bore gauge is a bit on the difficult side for the "run of the mill motorcyclist" to use and measure accurately with and in our case we are not requiring that MINUTE precision measurement. IMO the Calipers with the digital read outs are suitable for "Any Dumb Arse Motorcyclist " to read and understand. as all they have to get is to figures pretty much the same reading. the only difficult part is being the contortionist on the RHS. 
I like Bob's idea as it is pretty simple and easy, and a bloody site cheaper than buying that Triumph Tool.
| May-2011-1600, 20306 Tune, Mustang Vintage Solo Seat, Meerkat Cat Bypass, + Meerkat Modified Short TORS ,K&N Air Cleaner,K&N Oil Filter, JBQ lifting system, Gold Plug Magnetic Sump Plug,Dart Fly screen, Rivco Risers, GiPro Gear Indicator, Breakaway Cruise Control, Avon ISO Grips, Scorpion Western Low Handlebars, Kury Switchblade Pegs, Garmin Zumo390LM,Michelin RC2 on Front RC 3 on ,Modified Rear Drive Pulley Hub Bearings (Mat1600/Alex4 Modification) Front Susp: Std & 7.5W Oil /126mm Air Gap & Rear:Hagon Nitro's with 26Kg/cm Springs + Lots of other "Bling" stuff.
| | Post edited by GerPa on 02 Feb 2020 - 08:46 |
|
| | | MotorMac | | Jupiter | | | | Reg. Date | : | 29/08/2010 | | Posts | : | 1,787 | | Location | : | Nor Cal, United States |
|
| | Posted : 03 Feb 2020 - 14:07 Post title : Re: Rear Wheel Alignment. So easy, "even a caveman (with a lathe) can do it." (Re: GerPa) | | | Not only expensive, the factory tool isn't something you'd want to pack. The whole arrangement is rather awkward, especially compared to Harley's simple solution, and I'm a big fan of simple. Bob has it beat to be sure (assuming swingarm ends are as precise as lugs).
The bore gauge is used like a feeler gauge, never tried to read measurement as it doesn't matter. When left side feels same as belt side, it's done. Piece of uncle Bob's cake. (Ray? ;-)
|
|
|
| | | AZCactus | | Taranis | |  | | Reg. Date | : | 01/05/2013 | | Posts | : | 4,514 | | Location | : | AZ |
|
| | Posted : 03 Feb 2020 - 15:51 Post title : Re: Rear Wheel Alignment. So easy, "even a caveman (with a lathe) can do it." (Re: MotorMac) | | |
MotorMac wrote:
and I'm a big fan of simple.... |
|
me Too (eyeball test :)
| 2009 Thunderbird 1700 Big Bore
|
|
| | | GerPa | | Jupiter | | | | Reg. Date | : | 10/12/2011 | | Posts | : | 1,919 | | Location | : | Mackay, Central Queensland, Australia |
|
| | Posted : 03 Feb 2020 - 20:08 Post title : Re: Rear Wheel Alignment. So easy, "even a caveman (with a lathe) can do it." (Re: MotorMac) | | |
MotorMac wrote:
Not only expensive, the factory tool isn't something you'd want to pack. The whole arrangement is rather awkward, especially compared to Harley's simple solution, and I'm a big fan of simple. Bob has it beat to be sure (assuming swingarm ends are as precise as lugs).
The bore gauge is used like a feeler gauge, never tried to read measurement as it doesn't matter. When left side feels same as belt side, it's done. Piece of uncle Bob's cake. (Ray? ;-) |
|
Mike. When I do a LDR I pack the Measuring tool "Captive in the Axel" and put a lock nut on it so that it cant come undone, As somehow somewhere I lost my first alignment tool and can only submise  that I had by mistake left it in there and it came out. that I had by mistake left it in there and it came out.
| May-2011-1600, 20306 Tune, Mustang Vintage Solo Seat, Meerkat Cat Bypass, + Meerkat Modified Short TORS ,K&N Air Cleaner,K&N Oil Filter, JBQ lifting system, Gold Plug Magnetic Sump Plug,Dart Fly screen, Rivco Risers, GiPro Gear Indicator, Breakaway Cruise Control, Avon ISO Grips, Scorpion Western Low Handlebars, Kury Switchblade Pegs, Garmin Zumo390LM,Michelin RC2 on Front RC 3 on ,Modified Rear Drive Pulley Hub Bearings (Mat1600/Alex4 Modification) Front Susp: Std & 7.5W Oil /126mm Air Gap & Rear:Hagon Nitro's with 26Kg/cm Springs + Lots of other "Bling" stuff.
|
|
| | | Linkdog | | Thor | |  | | Reg. Date | : | 10/02/2011 | | Posts | : | 2,917 | | Location | : | Groveland, FL., United States |
|
| | Posted : 03 Feb 2020 - 21:22 Post title : Re: Rear Wheel Alignment. So easy, "even a caveman (with a lathe) can do it." (Re: GerPa) | | | You have the short TORS so yes it could have slid out, but not so with long TORS. I realized this after a test run and I had to remove the left side pipe to remove it.
| Never drink from a cow with one udder! 2010 1600 Blue&White ( of course ) Long TORS and HP filter. 2010 1600 Blue&White ( of course ) Long TORS and HP filter.
|
|
| | | danr620 | | Set | |  | | Reg. Date | : | 28/06/2016 | | Posts | : | 92 | | Location | : | United States |
|
| | Posted : 04 Feb 2020 - 12:43 Post title : Re: Rear Wheel Alignment. So easy, "even a caveman (with a lathe) can do it." (Re: Linkdog) | | | Guys,
I thought I had the short Tors, but now not sure. Looking at Linkdog's pics on my machine you couldn't put them in without removing mufflers and they wouldn't clear an inch. Still I may try a shorter version of the "stubs".
Dan
|
|
| | | Linkdog | | Thor | | | | Reg. Date | : | 10/02/2011 | | Posts | : | 2,917 | | Location | : | Groveland, FL., United States |
|
| | Posted : 04 Feb 2020 - 17:01 Post title : Re: Rear Wheel Alignment. So easy, "even a caveman (with a lathe) can do it." (Re: danr620) | | | Linkdog s pics
| Never drink from a cow with one udder! 2010 1600 Blue&White ( of course ) Long TORS and HP filter.
|
|
| | | danr620 | | Set | | | | Reg. Date | : | 28/06/2016 | | Posts | : | 92 | | Location | : | United States |
|
| | Posted : 06 Feb 2020 - 20:34 Post title : Re: Rear Wheel Alignment. So easy, "even a caveman (with a lathe) can do it." (Re: Linkdog) | |
|
| |
| |
|